Finishing with a Serger

When I finished the seams on my merino cardi I simply used a three thread overlocking stitch. This was, admittedly, what the instructions suggested you do. But I thought I’d share how to finish my finishing.

20130531-083259.jpg

Unravel the tail of your overlocking threads, with a hand needle take the threads back into the seam bringing them out about a centimetre away. Cut the threads at/ close to your fabric. Stretch the fabric out to pull the threads back between the two layers of fabric. Finishing in a neat way was particularly important on the sash ties and hem of the cardigan.

how do you finish your finishing?

Ps – don’t forget to enter my giveaway to win some awesome vintage sewing patterns! Simply like my Facebook page! Easy!

20130531-085144.jpg

Pattern Pyramid Winner & MORE

20130311-085210.jpg

Earlier this week I posted about the Pattern Pyramid I hosted. BUT THAT WAS ONLY HALF THE STORY – I received another, very thoughtful gift from Sew Biased, a copy of the original handbook that would have come with the Elna Grasshopper. Sew Biased noticed that I had previously blogged about My Grasshopper which was my grandmothers 1950s (or ’60s?) sewing machine. I used it for many years and even though I now have a computerised Janome my Grasshopper still keeps me company in my sewing room.

The manual has many pearls of wisdom…

20130317-220409.jpg
Turns out there are 17(!!!!!) place that you’re meant to oil

20130317-220942.jpg
And that I’ve been refilling the bobbin incorrectly all this time…awkward

20130317-220240.jpg
There’s also five whole pages on what to do when things go wrong. Very handy indeed.

Now on to the thing you’re actually wanting from this post … The winner of the Pattern Pyramid … AND THE WINNER IS Country Girl Couture – WELL DONE! Send me an email and I’ll send this package your way!

New Picture (2)

For now I’ll leave you with this slightly weird video of someone demonstrating the Grasshopper’s functions…

What I Do: Patterns

It occured to me the other day as I was reading The Slapdash Sewist that perhaps I am not normal.

As the love of sewing skipped a generation in my family I spend a huge amount of my sewing time guessing, experimenting, making it up and when all else fails reading the instructions or googling. However there is at least one piece of information about sewing that I distinctly remember coming from my mum: Don’t cut through the pattern, fold the sides under at the correct size and cut around that.

Like so:

20130125-110321.jpg

And when the pattern piece goes in, for example at the neckline, I cut through the pattern in wedges and fold them under:

20130124-092455.jpg

By comparison, from what I can remember, The Slapdash Sewist seemed to cut her pattern pieces twice. Once around the largest size on the pattern piece, and then a second time, under the pattern piece. I guess she must have her pins lined up right next to the correct sizing and hold the paper pattern up with one hand and cut with the other.

The way I do it is almost definately the way that my grandmother, the original owner of the Grasshopper, would have cut her patterns. And whilst I realise that I nolonger need to ration my patterns in a WWII kind of way, I quite like doing it the way I do.

So, how do you do it? I am strange!?

In Love with My New Serger/ Overlocker

As I mentioned in my previous post, I was given an overlocker or serger for my birthday! And before we get much further I’d like to ask if anyone knows the difference between the two? It seems that people in New Zealand talk about overlockers and the American blogs I’ve read talk about sergers. EHow tells me that they are pretty much the same except that sergers can do a few more stiches – is that true? For argument’s sake, I’ll refer to it as an overlocker in this post because I’m more comfortable with that term

So here is my birthday gift – a Baby Lock BL097

20121106-195050.jpg

This is IMMENSELY EXCITING for me because since taking up sewing again, in January this year, I have completed 15 items of clothes – 9 dresses, 4 skirts, and three tops (and have three more dresses and a cape waiting patiently to be finished *cough cough*). That is to say – this year I’ve been mad keen on sewing. And I set myself a wee goal, that if I was still sewing next January I would buy myself an overlocker. However, when the opportunity presented itself I couldn’t pass it up.

20121106-195732.jpg
So far I’ve only got white and black thread so bear with…

I’m not sure about the situation in other blogger’s homelands, but in New Zealand overlockers are hideously expensive, generally starting at $800, compared to sewing machines which can start at $200. So when this model came on sale and it coincided with my birthday, it was as though fate had it written in the stars. Mum and I went halve-sies and since then I’ve been overlocking like it’s going out of fashion.

20121106-200558.jpg

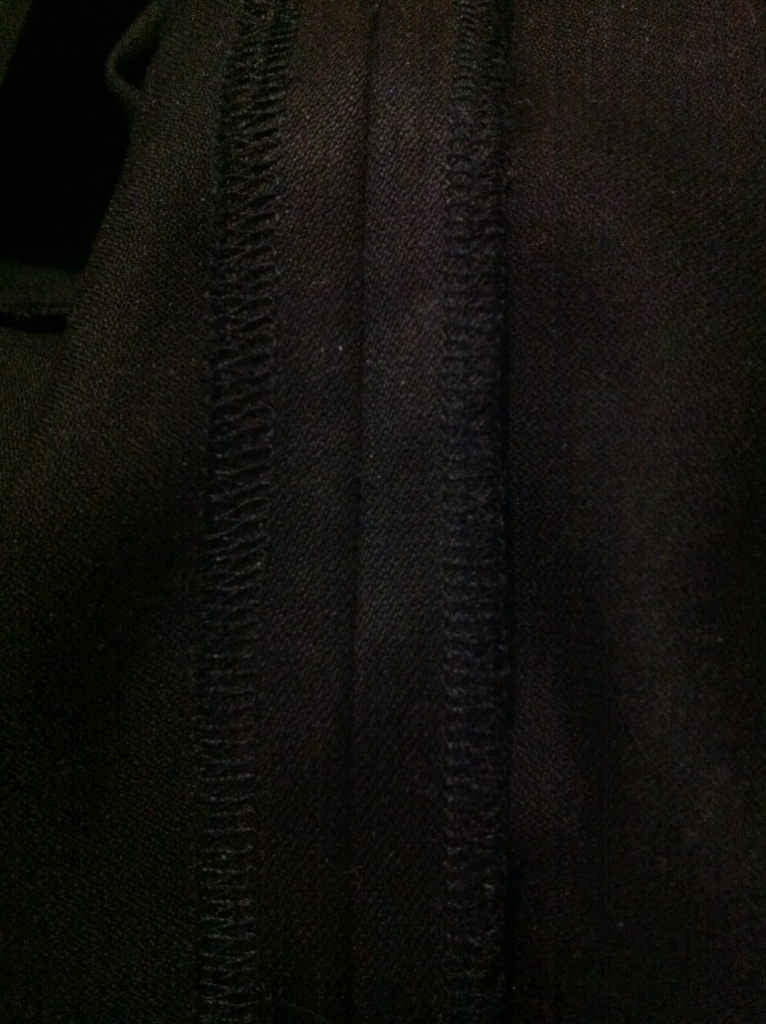
I took great joy in overlocking as I sewed my Lady in Red dress on Sunday; I’ve also overlocked the lining of my yellow Kate Middleton dress (above), yet another WIP; and I’ve overlocked this mystery item (below) which I’ll tell you about next time:

20121106-202214.jpg

There is an awful lot of chatter on the internet about how nervous-breakdown-inducing threading an overlocker is and I’m sure this chatter is only aided by scenes like this, which I am the first to say, look intimidating

20121106-211411.jpg

the inside of my overlocker

…and the fact that it comes with several tools – including this vaguely threatening looking pair of tweezers – doesn’t help

20121106-211416.jpg

And I may be new to this game, but patience goes a long way. I know, call me Sally the Sage. But truly, I’d never threaded an overlocker until this week and if I can do it then it must be dead simple. On the inside of this Baby Lock there is a colour coded guide of how to thread this machine

20121106-211028.jpg

If all else fails, follow the instructions…
– An old family saying

Puppy Love, Janome DC2050 Review

20120919-205612.jpg

It’s official – I’m in love. I bought an amazing new Janome DC2050 in the weekend. She is fantastic. Montana Designs asked me if I could write a review. And I sure can! I’ve copied the format from Pattern Review seeing as they’re the formula on review writing. So here we go:

20120920-082124.jpg

Approx price: NZ$499 was the actual price

I’ve had this machine for: four days

Recommended: yes I am infatuated

Features: these are all the features listed on the website. She does a stunning 49 different stitches (including buttonholes etc). That means this sewing machine goes backwards and does zigzag stitches too – pretty exciting when you compare it to my grandma’s sewing machine which I had been using until now! You can also sew button holes and shapes like flowers.

What I like about this machine: Everything. It has a function that threads the needle for you, there’s a needle up/ down function (way cooler than it sounds), I never seem to have to do anything with the tension, it’s easy to thread – to name a few. Also, this machine is computerised so it is really easy to use. AND it has this great function where you can moderate the speed at which you sew (using the play, fast forward buttons) for when you need to be precise (again very useful!)

Things i don’t like about this machine: some may call this puppy love but I can’t think of anything I don’t like about my sewing machine. It’s kinda like that Moldy Peaches song Anyone But You.

So now I need a name! Can you help me think of a name for my new machine? I’m thinking – something homely and sweet and old fashioned but sleek too. Got it?! The winner will receive this vintage pattern

20120920-081959.jpg

Do you have a great name for your sewing machine?

Giveaway Winners AND NEW SEWING MACHINE!!!

I BOUGHT A NEW SEWING MACHINE!!

I bought a brand new Janome DC2050 from Sewing Machine World in Onehunga. I was so excited when I got it home that I couldn’t wait to find the scissors so I (carefully) cut the box open with a knife.

20120916-100755.jpg

Look at the JOY!!

20120915-172949.jpg

And now she is set up in my sewing room:

20120915-173112.jpg

I am over the moon with my lovely new sewing machine. I’m am so pleased with it that I have decided to finish my Simplicity 2145 with it.

In other news: Last week I posted a giveaway – these three lovely patterns – if you liked Dresses and Me’s facebook page

20120915-165051.jpg

And the winner is … drum roll please … Stacy Sews and Schools. Congratulations Stacy!

The Grasshopper

The other day I found out that the sewing machine that I use is affectionately named the “Grasshopper”. It was my maternal grandmother’s and is still in perfect working order. It only goes one way – no reverse, no zig-zag, no button holes and certainly no fancy embroidery mode.

For the whole of my mother’s childhood it sat in her bedroom which was always called Mother’s Sewing Room.

My grandmother died when I was eleven and I had never known her. When I told my grandad that I liked to sew he asked if I might like my grandmother’s sewing machine. He went to get it serviced and there was only one minor adjustment that needed to be made.

It is all made of metal and weighs a tonne. It is green like the army and that is exactly what it reminds me of. It looks like something straight out of Soviet Russia.

Here are some photos of The Grasshopper:

Front

Top

The box it came in…

Which doubles as an extension table

I’ve had it ever since and absolutely love it.